Tracking WCF Operations Execution Time
We all at some point need to measure the performance of the code either because there is something that’s making the process take too long to execute or we just want to know what’s going on and at what rate our service gets hit daily. Tracking method calls and measuring code execution times can be achieved using different ways but I’d like to present a more elegant approach taking advantage of the extensibility options WCF exposes.
IOperationInvoker
This IOperationInvoker interface will be our main point of entry from where we can do all we want. It provides contract for classes that implement it to be used in the WCF execution pipeline to invoke operations. Since my goal is to track the execution time of the operation itself I create nothing but a wrapper around the default OperationInvoker class and I inject code that does the tracking. There is a method that is used for synchronous invocation and two other that handle the asynchronous calls. I will inject code only for synchronous calls but you are free to do it for the asynchronous too. For measuring execution time you should always use the Stopwatch class as it is more accurate than DateTime and TimeSpan because I have seen a lot of people using the latter not knowing that in the end their measurements might be wrong. Here is a sample implementation of IOperationInvoker:
public class TrackingOperationInvoker : IOperationInvoker
{
    private IOperationInvoker _defaultOperationInvoker;
    internal EventHandler<TrackingEventArgs> OnInvokeEnded;

    public TrackingOperationInvoker(IOperationInvoker operationInvoker)
    {
        _defaultOperationInvoker = operationInvoker;
    }

    public bool IsSynchronous
    {
        get { return _defaultOperationInvoker.IsSynchronous; }
    }

    public object[] AllocateInputs()
    {
        return _defaultOperationInvoker.AllocateInputs();
    }

    public object Invoke(object instance, object[] inputs, out object[] outputs)
    {
        Stopwatch stopwatch = null;
        try
        {
            stopwatch = Stopwatch.StartNew();
            return _defaultOperationInvoker.Invoke(instance, inputs, out outputs);
        }
        finally
        {
            RaiseInvokeEnded(stopwatch.ElapsedMilliseconds);
        }
    }

    public IAsyncResult InvokeBegin(object instance, object[] inputs, AsyncCallback callback, object state)
    {
        return _defaultOperationInvoker.InvokeBegin(instance, inputs, callback, state);
    }

    public object InvokeEnd(object instance, out object[] outputs, IAsyncResult result)
    {
        return _defaultOperationInvoker.InvokeEnd(instance, out outputs, result);
    }

    private void RaiseInvokeEnded(decimal elapsedMilliseconds)
    {
        if (OnInvokeEnded != null)
        {
            OnInvokeEnded(this, new TrackingEventArgs(elapsedMilliseconds));
        }
    }
}
I have created a simple EventArgs class that holds the ellapsed time information and the consumer of the invoker is responsible for handling the InvokeEnded event and do whatever makes sense with that information.
public class TrackingEventArgs : EventArgs
{
    public TrackingEventArgs(decimal elapsedMilliseconds)
    {
        ElapsedMilliseconds = elapsedMilliseconds;
    }

    public decimal ElapsedMilliseconds { get; private set; }
}
IOperationBehavior
The IOperationBehavior interface can be used to provide some additional behavior to each operation. We will create a new class that implements it and also make it an Attribute class so that we can decide which operation we want to track and decorate it. In order to use the previously implemented OperationInvoker class we will add some code in ApplyDispatchBehavior method to replace the default invoker with our own.
public class TrackingOperationBehaviorAttribute : Attribute, IOperationBehavior
{
    public void AddBindingParameters(OperationDescription operationDescription, System.ServiceModel.Channels.BindingParameterCollection bindingParameters)
    {

    }

    public void ApplyClientBehavior(OperationDescription operationDescription, System.ServiceModel.Dispatcher.ClientOperation clientOperation)
    {

    }

    public void ApplyDispatchBehavior(OperationDescription operationDescription, System.ServiceModel.Dispatcher.DispatchOperation dispatchOperation)
    {
        TrackingOperationInvoker invoker = new TrackingOperationInvoker(dispatchOperation.Invoker);
        invoker.OnInvokeEnded += (sender, args) => { /* Log the call and execution time */ };
    }

    public void Validate(OperationDescription operationDescription)
    {

    }
}
You can put whatever logic you find fit in the commented part of the code – log it in the Windows EventLog, dump it in a database or a file. You could go even further and log the name of the operation, what parameters it was called with, etc. I haven’t implemented that here because I focused on tracking the code execution time only but it’s not that difficult to be implemented.
Summary
In this post I tried to present one simple solution to a trivial problem. WCF provides great extensibility options to developers and everything looks so elegant at the end. If you need to add a new operation to your service and track its execution time – no problem you just go there and decorate it with that attribute. That’s all you have to do, pretty neat 🙂
ASP.NET MVC 3: Unobtrusive Client Side Validation
In this post we will look at one of the new features of the fresh new release of ASP.NET MVC 3 – using unobtrusive client side validation through the new HTML5 data-* attributes. I will show what these attributes look like and how they come into play.
Client Validation by Default
One of the main differences between the new version and the previous two MVC 1 and MVC 2 is that client side validation is turned on by default. This is done using an AppSetting in the web.config file:
<appSettings>
  <add key="ClientValidationEnabled" value="true"/>
</appSettings>
If you remember up until ASP.NET MVC 3 you had to explicitly specify that you want client side validation to be performed like this in your view:
<% Html.EnableClientValidation(); %>
If you don’t want any validation in the browser you could turn it off by changing the AppSetting value of ClientValidationEnabled to false.
Unobtrusive Validation
Validation in ASP.NET MVC is based on meta data provided by DataAnnotations. There are quite a few classes that are really handy in describing what rules your properties must obey and the framework will take care of the rest. The HTML Helper classes (Html.TextBoxFor, Html.EditorFor, etc.) used to render different HTML controls look up these meta data attributes when the response is being generated and render the appropriate output so that validation can occur on the client’s browser.
By taking advantage of Unobtrusive JavaScript you don’t clatter your HTML markup with unnecessary JavaScript event handlers and so on. The HTML elements describe themselves through attributes and you get a HTML5 ready markup by default. Here is a sample UserModel class that I will use in a create user form annotated with validation attributes:
public class UserModel
{
    [Required]
    [StringLength(50)]
    public string Username { get; set; }

    [Required]
    public string Password { get; set; }

    [Required]
    [Compare("Password")]
    public string ConfirmPassword { get; set; }

    [Required]
    [StringLength(50)]
    public string FirstName { get; set; }

    [Required]
    [StringLength(50)]
    public string LastName { get; set; }

    [Required]
    [StringLength(50)]
    [RegularExpression("^[a-z0-9_\\+-]+(\\.[a-z0-9_\\+-]+)*@[a-z0-9-]+(\\.[a-z0-9-]+)*\\.([a-z]{2,4})$")]
    public string Email { get; set; }
}
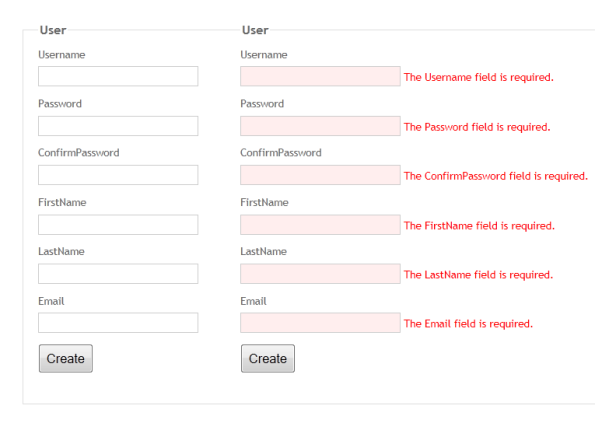
When the user tries to submit the form with invalid data he/she will see the following messages:
If we look at the confirm password input element for example we will see the following HTML markup:
<div class="editor-field"> <input type="password" name="ConfirmPassword" id="ConfirmPassword" data-val-required="The ConfirmPassword field is required." data-val-equalto-other="*.Password" data-val-equalto="&#39;ConfirmPassword&#39; and &#39;Password&#39; do not match." data-val="true"> <span data-valmsg-replace="true" data-valmsg-for="ConfirmPassword" class="field-validation-valid"></span> </div>
As you can see there are a few data-val* attributes that add meta data to both this field and the span element that shows validation messages. Behind the scenes ASP.NET MVC uses jQuery Validation plugin and the Unobtrusive validation support library for jQuery Validate written by Microsoft. If you however decide to turn unobtrusive validation off your HTML markup won’t include the new HTML5 data-* attributes but a JavaScript code that will set up the Validation plugin.
For the ConfirmPassword property I have used one new attribute that comes with this new release part of .NET Framework 4.0 – CompareAttribute. It gives you the ability to compare two properties of a model.
Summary
As you can see ASP.NET MVC 3 is not lagging behind the current trends in web development utilizing some of the new HTML5 features and unobtrusive JavaScript. What I like about ASP.NET MVC and DataAnnotations is that we as developers don’t need to focus and waste too much time on simple validations like required fields, maximum length, etc. and focus on the business logic and any business rules that need to be enforced.
Architecting Loosely Coupled ASP.NET MVC Web Applications Talk
Last week Kaloyan Bochevski and I gave a talk for the Web Platform User Group at Microsoft, Bulgaria. The topic was Architecting Loosely Coupled ASP.NET MVC Web Applications. For both of us it was quite an interesting experience as it was our first presentation and we for sure have a lot to improve for any future talks we might have.
The agenda
Our agenda covered a lot of areas even though it was mainly focused on how to design a loosely coupled ASP.NET MVC application. This was our list for the talk:
- Dependency Injection with Spring.NET
- Custom Authentication
- Custom Attributes
- jQuery Grid with Model Binders
- Unobtrusive Validation with Data Annotations
- Security (XSS Anti-Forgery token)
- Covariance & Contravariance – IQueryable<out T> interface in .NET 4.0 and extension methods for .NET 3.5
- Unit testing (NUnit, Selenium)
Over the next few weeks we will post articles that cover some of the bullets in the list. Any comments would be greatly appreciated.
ASP.NET: PostBackUrl and How It Can Break ViewState
I hadn’t done pure ASP.NET Web Forms development for quite a while and I had to create a really simple edit form. The requirement was to show a confirmation message if there are unsaved changes when the user clicks on a button which would redirect him to another page. It’s really straight forward but as most seemingly simple things it turned out that it is somewhat trickier. I will explain every step I took down the road to get it done and what problems I encountered.
Buttons and PostBackUrl
I started with two buttons on the page:
– Save button that triggers a postback to the server and persist the changes that the user made
– Return button that posts back to the previous page – has its PostBackUrl property set to the url of the corresponding page
Then I wrote some JavaScript code that detects if there is any kind of change between the initial state of the page data and the current one when the user clicks the Return button. If nothing is changed the user was taken to the previous page. So far so good. But if there are some changes a confirmation message appears (I’m using a custom modal dialog, not the default browser’s confirmation dialog implementation) that notifies the user of unsaved pending changes and whether or not he/she wishes to navigate away from the current page anyway. This is where everything goes wrong. By default the ASP.NET Button control renders some JavaScript code for the click event of the button when PostBackUrl is set and it is executed regardless of my event handler.
Note: I am not attaching event handlers directly as attributes on DOM elements. Had I done this nothing would have messed up in my page. But this is really a bad way of doing client side development that is against unobtrusive JavaScript style.
Anyway this JavaScript code changes the form element’s action attribute with the value set for PostBackUrl and if the user decides that he/she wants to stay on the page and to save his/her changes the next time he/she clicks the Save button it will try to post back to the wrong page. Let’s say my page is called Default.aspx and I have another page Defautl2.aspx. Here is the rendered button:
<input type="submit" id="btnReturn" onclick="javascript:WebForm_DoPostBackWithOptions(new WebForm_PostBackOptions("btnReturn", "", false, "", "Default2.aspx", false, false))" value="Return" name="btnReturn">
As you can see there is a JavaScript function WebForm_DoPostBackWithOptions that gets called and receives a single parameter a helper object with all the necessary data to initiate a post back. As you can see the fifth parameter for the WebForm_PostBackOptions constructor is the page to which the post back would occur. Inside the WebForm_DoPostBackWithOptions the action attribute of the page’s form element is changed to Default2.aspx. This won’t be a problem if I was not preventing the postback from occurring. However I do prevent it and from now on any subsequent postback triggered by a control on the page would post back to Default2.aspx. But since the ViewState of the first page differs from that of the second one an exception is thrown:
Validation of viewstate MAC failed. If this application is hosted by a Web Farm or cluster, ensure that <machineKey> configuration specifies the same validationKey and validation algorithm. AutoGenerate cannot be used in a cluster.
What is my solution then?
New form element
I decided to go for a solution with another form element for the second page and get rid of the PostBackUrl property on the button. Now when the user decides not to leave the page no JavaScript code changes the action attribute of the form element and everything is the way it is supposed to be. If he/she chooses to go ahead and go to the previous page then the second form element is submitted and the user is taken to the previous page. Keep in mind that you should not define more than one form server element with runat=”server” attribute because ASP.NET supports only a single form element. You could either create it as a standard HTML element or add it dynamically on the page.
Summary
This is not the first time I encounter this kind of exception but it was the first time I did for this kind of scenario and I was a bit puzzled in the beginning. So I needed to inspect what was going on behind the scenes and come up with a simple and quick solution. It was obvious that something is wrong when the button is clicked and debugging the injected function that makes the actual postback revealed it. There might be more elegant and clean solutions for resolving this issue so everyone is welcomed to share them.
DataAnnotations in Interfaces with Extension Methods
Today’s blog post is about encapsulating validation rules in interfaces. If you are to develop a loosely coupled, unit-testable application you are for sure going to use some Dependency Injection framework (take a look at this post for Spring.NET by Kaloyan Bochevski). In order to accomplish this you start by designing some interfaces for your different logical layers. There you end up with interface contract definitions which must be implemented by your classes. You could even go further than just declaring some methods and properties and put validation rules there. This way you would encapsulate almost everything in the interface contract so it wouldn’t be spread across different class files or assemblies.
Data Annotations
DataAnnotations provide a great way of performing validation over data models in ASP.NET MVC and ASP.NET WebForms. Just by decorating your entity classes’ properties with the necessary attributes you can get out of the box validation with no code at all. These special attribute classes can be found in System.ComponentModel assembly which needs to be referenced from your project in order to get you ready to do your validations. In ASP.NET MVC this goes even further because you could enable even client side validation of your forms that are bound to data annotated models – the framework injects JavaScript code that handles all of this as long as you include some JavaScript files and enable client side validation. You could decorate your properties and make them required, fall in a specific range of values, have maximum number of characters or abide more complex rules with regular expressions. Here is what a sample entity interface definition might look like:
public interface IPerson : IValidationEntity
{
    [Required]
    string FirstName { get; set; }

    [Required]
    string LastName { get; set; }

    [Range(5, 100)]
    int Age { get; set; }

    [Required]
    [StringLength(20)]
    string City { get; set; }

    [Required]
    [StringLength(20)]
    string Country { get; set; }
}
If you are not developing against ASP.NET MVC or ASP.NET, let’s say for example you are doing a RESTful WCF service that needs to validate its input or you have some intermediary entities that are used to exchange information between different parts of a multi-layered system you could still take advantage of this validation model. Looking at the information for the System.ComponentModel.DataAnnotations Namespace at MSDN you can immediately see that all of the attributes derive from ValidationAttribute which has an IsValid() method. Basically we can get all validation attributes and check if the respective value is valid – this is how it works under the hood after all. Since we would have several classes that need to be validated then we need to create some common validation logic that we can reuse. This brings me to my next point.
Extension Methods
Extension methods provide a great deal of flexibility that I like to take advantage of whenever I can. In our scenario they will enable us to define some extensions over our interface and we will be able to validate all classes that implement this interface. First I’ll show you the definition of the interface:
public interface IValidationEntity
{
    bool Validate();
    IEnumerable<string> GetErrors();
}
There are only two methods that we need to develop:
public static class ValidationExtensions
{
    public static bool IsValid<T>(this T entity)
        where T : IValidationEntity
    {
        Type t = entity.GetType();
        Type[] tInterfaces = t.GetInterfaces();

        bool isValid = true;
        foreach (var ifc in tInterfaces)
        {
            foreach (var prop in ifc.GetProperties())
            {
                var propVal = prop.GetValue(entity, null);
                foreach (ValidationAttribute attr in prop.GetCustomAttributes(typeof(ValidationAttribute), true))
                {
                    if (attr.IsValid(propVal))
                        continue;

                    isValid = false;
                    break;
                }

                if (!isValid)
                    break;
            }

            if (!isValid)
                break;
        }

        return isValid;
    }

    public static IEnumerable<string> GetValidationErrors<T>(this T entity)
        where T : IValidationEntity
    {
        Type t = entity.GetType();
        Type[] tInterfaces = t.GetInterfaces();

        foreach (var ifc in tInterfaces)
        {
            foreach (var prop in ifc.GetProperties())
            {
                var propVal = prop.GetValue(entity, null);
                foreach (ValidationAttribute attr in prop.GetCustomAttributes(typeof(ValidationAttribute), true))
                {
                    if (attr.IsValid(propVal))
                        continue;

                    yield return attr.FormatErrorMessage(prop.Name);
                }
            }
        }
    }
}
IsValid checks if there are errors at all and GetValidationErrors returns a generic collection with descriptive error messages if we ever need to return some meaningful information (in case of a RESTful service). Both methods use reflection to get to the validation metadata that we have defined. The only interesting thing in the code above is that we need to iterate over the attributes of the class’s interfaces otherwise they won’t be available to us.
You could download a sample console application that utilizes the idea of defining validation rules on the interface.
How to Handle Forms Authentication Timeout During an AJAX Request
I stumbled upon an interesting issue the other day – how to respond to an error during an AJAX request after a period of user inactivity and a session expiration of the logged in user. In such situation you should either redirect the user to the login page or show a modal dialog where he/she could enter his or her credentials and continue their work. But this seemingly simple task turned out to be not so trivial. Here is the scenario:
- the user logs in
- after a period of inactivity the session times out
- the user makes some action which triggers an AJAX request to the server which results in a response with a status code of 302 (Redirect) and the URL to the login page
- the browser parses the response and issues a request to the provided redirection URL
- the AJAX request completes, the response is the HTML markup of the login page with a status code of 200 (OK) which results in an error because the expected data type is JSON and it cannot be parsed correctly
The problem occurs during the last two points and the inability to determine the right cause of the error. It took me an hour or so to pinpoint and understand why this is happening. After this I tried some ideas and came up with a really simple solution.
What I needed was to pass the information to the XmlHttpRequest object that the user’s session had expired and to show a modal dialog so he or she could enter his or her credentials. That’s why I had to get rid of the redirection but only for AJAX requests because I still needed unauthenticated users to be redirected to the login page for non-AJAX requests. In order to do that I removed the Response.RedirectLocation in the Application_EndRequest event inside the Global.asax file:
protected void Application_EndRequest(object sender, EventArgs args)
{
    HttpContextWrapper context = new HttpContextWrapper(Context);
    if (context.Response.StatusCode == 302 && context.Request.IsAjaxRequest())
        context.Response.RedirectLocation = string.Empty;
}
After that it was easy to check the status code in the error handler of the AJAX request and since I knew that a 302 status code is sent by my application only when the user is not authenticated I was able to respond accordingly.
Show Save As Dialog With Content-Disposition Response Header
In this post I will talk about how you can force the browser to show a Save As dialog with a predefined filename. For the purpose of my example I will build on my previous post.
Applicability
This might be really useful in some type of applications – a file manager, email client application like Gmail (downloading file attachments) and exporting data into different formats. You could rely on the browser to show Save As dialog but that might not be the case. It will prompt you to save a file if it can’t render its contents (the content type is unknown) but it will set the filename to the url it was downloaded from (you do not have a choice to give it a more proper name). Luckily there is a special response header part of the HTTP Specification that accomplishes that.
Content-Disposition Header
The Content-Disposition header is optional and gives you the ability to explicitly specify the file name of the requested resource and force the showing of a Save As dialog. The file resource could be specified as inline (default one) or attachment. If omitted the browser tries to render it as if it is specified as inline. In our case we need to set it as an attachment so that we can force the Show As dialog to pop up:
Content-Disposition: attachment
With the filename parameter we notify what the file name of the requested resource should be. We can give it any meaningful name we want. If the requested relative url is the following /MySite/Export and the filename parameter is missing then the file name that the browser would suggest will be Export. This is in no way user-friendly. Here is how we can set the file name using the Content-Disposition header:
Content-Disposition: attachment; filename=ExportedUser_06272010.xml
Now the Save As dialog would suggest the file be saved as ExportedUser_06272010.xml. You can implement any kind of naming convention for your application and make it more user-friendly.
Server side modifications
Since we already know how to accomplish everything we can change the action method responsible for exporting users to xml from my previous post:
[HttpPost]
public ActionResult Export()
{
    User user = HttpContext.Cache["user"] as User;
    if (user == null)
        return View("Index");

    HttpContext.Response.AddHeader("Content-Disposition", string.Format("attachment; filename={0}_{1}.xml", user.FirstName, user.LastName));
    return View("User", user);
}
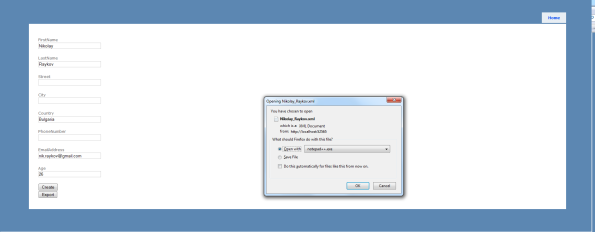
The important part is where we add the Content-Disposition header to the response using the AddHeader method on the HttpContext’s Response property. If we start the application and click on the Export button the Save As dialog pops up:
Summary
In some scenarios you need to have control over the browser and force it to show the Save As dialog and explicitly set the file name of the resource. This is accomplished with the Content-Disposition response header. I have attached the updated application so you can play around with it.
Output XML Using Strongly Typed Views in ASP.NET MVC
Recently I had to create an export to XML functionality in an ASP.NET MVC application. The first thing that came up to my mind was to use LINQ to XML to serialize my entity and then write it to the output stream with the FileStreamResult class. It could not be much more easy, right? But what is really a single HTML page – one irregular XML document (XHTML is well formed XML). Then I give it a thought and realized that I could use a strongly typed view for my entity and have it change its content type to text/xml.
XML View
Here is my sample User class that would be used to generate the XML file:
public class User
{
    [Required(ErrorMessage = "First Name is required")]
    public string FirstName { get; set; }

    [Required(ErrorMessage = "Last Name is required")]
    public string LastName { get; set; }

    public string Street { get; set; }
    public string City { get; set; }

    [Required(ErrorMessage = "Country is required")]
    public string Country { get; set; }

    public string PhoneNumber { get; set; }

    [Required(ErrorMessage = "Email Address is required")]
    public string EmailAddress { get; set; }

    [Required(ErrorMessage = "Age is required")]
    [Range(0, 100, ErrorMessage = "Age must be between 0 and 100")]
    public int Age { get; set; }
}
In Solution Explorer right click on your view folder and choose Add > View. On the following dialog enter the name of the view and check the Create a strongly-typed view checkbox which enables you to select a view data class. Finally click on the Add button and you have created the view.
Now you are ready to edit its contents. The first thing you need to do is to change the ContentType attribute of the Page directive to text/xml:
<%@ Page Language="C#" Inherits="System.Web.Mvc.ViewPage<ExportToXml.Models.User>" ContentType="text/xml" %>
This way you tell your ASP.NET MVC application to change the response header for this resource. The client’s browser would parse it and render the document as XML since it knows how to handle such type of resources.
Replace any other generated content with the XML you want to output. This is what the XML markup for my entity looks like:
<%@ Page Language="C#" Inherits="System.Web.Mvc.ViewPage<ExportToXml.Models.User>" ContentType="text/xml" %><?xml version="1.0" encoding="utf-8" ?>
<User>
    <FirstName><%= Model.FirstName %></FirstName>
    <LastName><%= Model.LastName %></LastName>
    <Street><%= Model.Street %></Street>
    <City><%= Model.City %></City>
    <Country><%= Model.Country %></Country>
    <PhoneNumber><%= Model.PhoneNumber %></PhoneNumber>
    <EmailAddress><%= Model.EmailAddress %></EmailAddress>
    <Age><%= Model.Age %></Age>
</User>
As you can see it’s all really simple, no rocket science. Just be sure to put the declaration of the XML right after the page directive (not on a new line) otherwise it won’t be parsed properly by the browser.
Action Method
The action method responsible for returning the XML document has a return type of ActionResult and calls the View helper method passing the name of the view and the entity that would be exported:
[HttpPost]
public ActionResult Export()
{
    User user = HttpContext.Cache["user"] as User;
    if (user == null)
        return View("Index");

    return View("User", user);
}
As you can see if there is no user in the cache the default view is rendered, otherwise the strongly typed XML view is rendered passing the user entity instance.
Putting It All Together
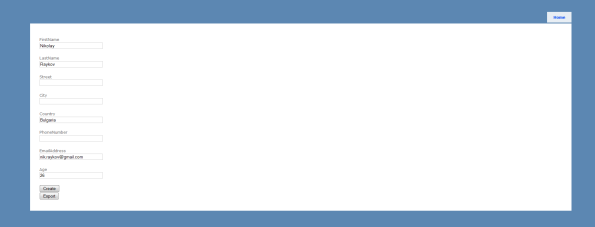
Now that we have created this we can create an user and then export it. This is what the create user page looks like:
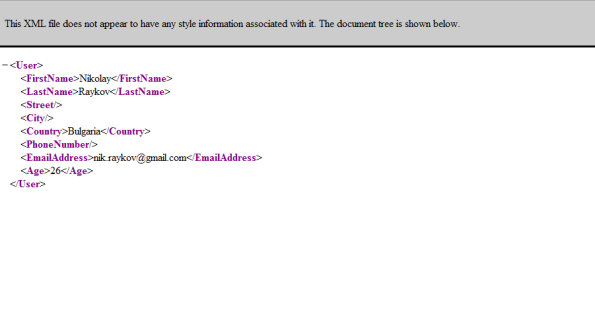
After the user is created clicking on the Export button will call the Export action method which will render the strongly typed XML view. The generated XML is the following:
Summary
Using this technique is really simple and makes your code more readable and maintainable because you are relying on declarative code. If you need to make a change you just edit your view’s aspx page and you are ready – no need to recompile and redeploy on the production server. Keep in mind that this solution might not be applicable to your scenario – it is just one way to solve a problem. In a future post I will show you how you can make the browser show a Save As dialog with a specific file name (very useful in some situations).
You could download this sample application from here.
Using IIS 7 Output Caching Capabilities
One of the great features of IIS 7 server is output caching. If you are performance enthusiast you have for sure taken advantage of caching in one way or another. If not this will be a chance for you to find out how easy it is to enable output caching for the entire server, single web site or on a more granular level. Just a few settings in the applicationHost.config or your application’s web.config files are what you need. If you do not feel at ease editing some configuration files you could use the IIS Manager as well.
Configuration files
You could configure your server by editing the applicationHost.config file located at the following path – %windir%\system32\inetsrv\config. It is the main file for the IIS 7 server that defines all settings for all sites, applications, application pools, etc. If you choose to edit this file you should be aware that the settings you enter will be applied globally. If you only want a single site or application to be affected you could edit its web.config file. Regardless of which file you edit the syntax is the same.
There are two ways for invalidating the cache – using a timeout period (CacheForTimePeriod) or detecting a change in the resource file (CacheUntilChange). Below is a sample configuration that uses both ways for caching:
<configuration>
...
  <system.webServer>
    <caching enabled="true" enableKernelCache="true">
      <profiles>
        <add extension=".png" policy="CacheUntilChange" />
        <add extension=".gif" policy="CacheForTimePeriod" duration="12:00:00" />
      </profiles>
    </caching>
  </system.webServer>
</configuration>
You could tell the IIS 7 server to cache a resource based on different criteria. In order to do this use the following attributes:
– varyByQueryString – caches different versions based on the query string
– varyByHeaders – caches different versions based on the request headers
You should be aware that when you are using CacheForTimePeriod the browser won’t make a request to the server. This does not apply to CacheUntilChange – a request is made but the response might not be full, e.g. the file hasn’t changed since the last request and the server returns a 304 status code indicating that the file must be loaded from the browser’s cache.
If you want to take advantage of kernel mode caching you could just replace the policy attribute with the kernelCachePolicy one. There are some limitations of the kernel mode output caching though – varyByHeaders is not supported.
If you have a scenario where you need greater control over what gets cached and customize it to your needs you might consider applying policies on a per folder basis. Here is a sample configuration that sets up the output caching for a single folder:
<configuration>
...
  <location path="Images">
    <system.webServer>
      <staticContent>
        <clientCache cacheControlMode="UseMaxAge" cacheControlMaxAge="12:00:00"/>
      </staticContent>
    </system.webServer>
  </location>
</configuration>
Every file located under the Images folder would be cached on the client’s browser for 12 hours. If you are sure that some of your resources will not change on a regular basis you could set up a greater time period, i.e. 1 year.
GUI Configuration
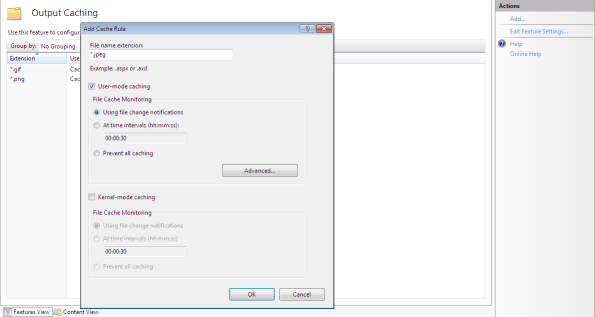
You could set up these policies from inside IIS Manager as well with almost no effort on your side. To configure the output caching globally for a given file extension select the Output Caching feature and click Add… You will be presented with the following dialog:
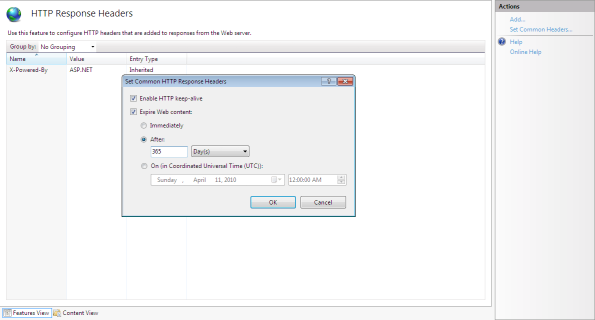
There is another feature that you could use to configure the response headers and control the output caching. Choose HTTP Response Headers and click on the Set Common Headers… action link and you will see the following dialog:
These headers could be applied on a per folder basis. If you need to add additional response headers you could use the Add… action link button as well.
As you can see all the settings that you could configure from IIS Manager could be edited by hand in your configuration file.
Summary
In this blog post I showed you how you can set up a cache policy for your web application both through web.config and IIS Manager. Different kinds of applications could improve their performance significantly from the built-in output caching capabilities in IIS7. It is really easy to set them up and there is no excuse for anyone not taking advantage of them. Of course you could implement your own custom caching policies that do not rely on IIS7 – just implement the IHttpHandler interface which gives you an opportunity to intercept the request and perform whatever suits your scenario and return the necessary response.
Ext JS Grid – rowclick and rowdblclick Issues
Last week I found an interesting issue regarding the rowclick and rowdblclick events. Here is the scenario:
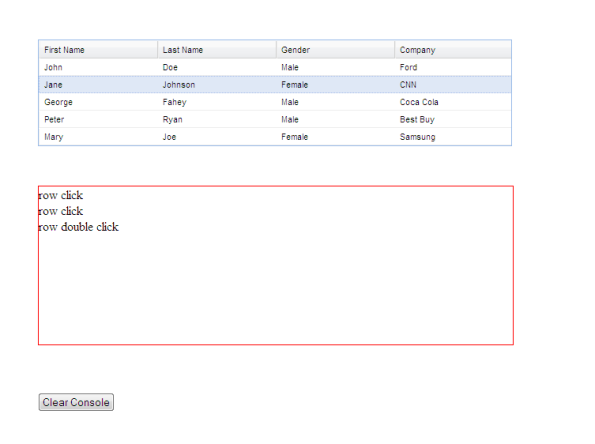
I have a page with an Ext JS Grid populated with some data that the user can act upon – edit fields, show field specific context menus, do some operations, etc. There is this specific requirement that the user can single click and double click a row. These are completely different actions, therefore a different operation must be performed. However due to the intrinsic browser behavior of the click event when you double click the result is somewhat unexpected – two click events and one double click event are fired. And this is where all the problems began – the code for the click event is executed twice before the double click event even though you would expect only the double click event handler to be called.
Note: I made my tests on Firefox, Google Chrome and Internet Explorer 8. Double click caused a single click event to be fired only on IE8.
Here is a screenshot of the event firing sequence in Firefox when you double click on a grid’s row:
This browser behavior caused some performance issues for my application, so I had to come up with some kind of a workaround.
Workaround
I came up with a simple solution which defers the call to the rowclick event handler in time so that the rowdblclick event handler be called and use a helper variable to indicate that double click took place. Here is the rowclick event handler:
'rowclick': function(){
    window.setTimeout(function(){
        if (!isDblClick) log.innerHTML += '<div>row click</div>';
    }, 0);
}
Calling the system function setTimeout even with 0 milliseconds does not mean that the code will be executed right away. The reason for that is that setTimeout is not executed as high priority function and the interval that it waits will be more than what you have specified. This little trick causes the rowclick event to be fired only once before the rowdblclick event. If you want to completely be sure that it won’t be fired just increase the interval as much as you find appropriate. But keep in mind that it should be reasonably small as you would want the rowclick event handler to be executed fast enough when the user performs a single row click.
Here is the rowdblclick event handler code:
'rowdblclick': function(){
    isDblClick = true;
    log.innerHTML += '<div>row double click</div>';

    window.setTimeout(function(){
        isDblClick = false;
    }, 0);
}
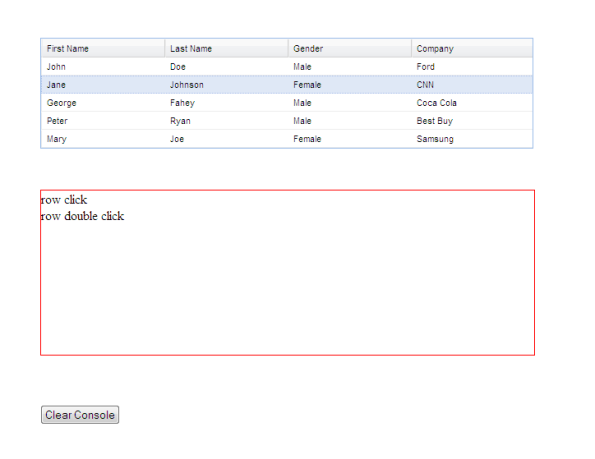
At the end of the event handler the helper variable isDblClick is set to false so that you would be sure that the rowdblclick event handler is done. Again you could set a greater interval if you need to. The following screenshot shows what is the the output of the rowdblclick event with this workaround in place:
If you want to be certain that only the rowdblclick event handler would be executed you could increase the deferring of the rowclick event handler. You could download the source code for this workaround from here.
Summary
This is just a simple workaround for this issue that partially fixed my performance issues – I made some other code tweaks that drastically improved the speed of execution. As an overall result the time of execution dropped more than 2.5 times. However, be advised that this is not a bulletproof solution for the problem – it depends on the performance load of the browser and how long it takes for your event handler to finish executing. The best advise I can give you though is to use only one of these events if it is appropriate for your scenario. If this is not an option then you could use this workaround or some other tricks.
